Reading the Bible-The Division of land of the Children of Israel

Our Daily Reading of the Bible

CHAOTIC TIMES - READ the Bible with Us for Peace

Join Us As We Read Through the Bible This Year

READING THE BIBLE IN 1 YEAR: Lies, Trickery & Deception

Reading the Bible in 1 Year: Ai Destroyed

READING THE BIBLE IN 1 YEAR: Joshua 7 - Greed, Theft & Punishment

Reading the Bible- Talking about Atlantis, Math & More

Angels...? We're Reading the Bible Today: Joshua 5

Reading the Bible in 1 Year: The Death of Moses

Generosity and Divorce are themes as we Read the Bible this year

Reading the Bible in 1 Year: History of the Children of Israel

The Nation of Israel - Reading the Bible in 1 Year

Wednesday, December 12, 2012

Homemade Pizza

I usually make at least two pizzas when I make homemade pizza. The reason is because I love thin, crispy crust and my kids like thicker less crisp pizza. (Bake at 425 for about 15 minutes or until crust is golden brown and cheese is well-melted)

Here's how I make it:

Pizza Dough Ingredients:

1 package of yeast
1 and 1/2 cusp of water
3 and 1/2 cups of flour
2 tablespoons of oil (olive oil)

Instructions:

Take the 1 and 1/2 cups of WARM water and pour the yeast into it and let it sit for about five minutes to let it activate.

Mix together the flour, olive oil and yeast-infused water. Mix and until well-blended. Then put your ball of dough in a metal pan (that has been greased with olive oil) and cover with saran wrap.

The dough will rise best if the room is warm. If it's not, put your covered dough near a heat vent or on top of the stove. Let it rise for an hour and then roll it out.

PIZZA INGREDIENTS:

2 cans of Tomato paste/sauce  (you can use spaghetti sauce - if you want)
2 cups of mozzarella
2 cups of cheddar cheese
1 cup of chopped olives
(optional: chicken, beef or ham)

I like cheese pizza best but you could add whatever you want. Here's how I made my pizzas.


Tuesday, December 11, 2012

Kate Herzog Scholarships

Willamette Writers and Barnes and Noble

Sponsor the 2013 Kate Herzog Scholarships

In 2013, high school seniors and college freshman and sophomores can enter. There are four scholarships. Financial amounts to be determined will be in the range of $100-$250.

To apply for a 2013 scholarship please forward:


1. Original, unpublished writing sample of less than 1000 words, typed, double-spaced. The sample should be titled, but should not include any information about the author. Writing published in school publications is eligible. Any topic. Fiction and poetry also accepted.

2. A cover letter with contact information that includes the title of the writing sample, and a paragraph that includes information about the student's goals as a writer.

3. Letter of recommendation from an instructor in the current academic year.
Submit all materials to the following address:
    Kate Herzog Scholarship
    Willamette Writers
    2108 Buck St
    West Linn, OR 97068

In previous years, student entries have ranged about one third fiction, one third essays, one third memoirs, and some poetry. Letters of recommendation have generally run one to two paragraphs.

Dates to Remember
    Application Deadline March 27th, 2013 (post mark deadline; must be in the mail by the 27th)
    Finalists Will Be Announced June 15, 2013
    Scholarships Will Be Awarded August 4th, 2013

Monday, December 10, 2012

The Great Critique

Subject: The Great Critique

The Great Critique - January 19, 2013

A chance for writers to be critiqued by a professional and their peers.

Location: TaborSpace, 5441 SE Belmont St, Portland, OR 97215

Time: 9:30 to noon.

Never been in a critique group? Wish you could be critiqued by someone who is ahead of you in the publishing game? Want to strengthen your work? Need a fresh set of eyes and ears on that oft-revised piece? Want to have your manuscript ready for the May conference? This is your chance. A published writer will lead each small group and critique your manuscript. You'll also hear others' work and get feedback from those writers too. Plus you'll learn from the comments by the critique leader about the work of others. Cost:

Early Bird Rate:

SCBWI members - $8.00 (That's less than the price of a Friday night movie!)

Nonmembers - $13.00 (If you bought any refreshments, your movie night would cost way more!)

After January 1, 2013: $10 and $15 for members and nonmembers respectively.

Sunday, December 9, 2012

Tulle Cute Christmas Tree


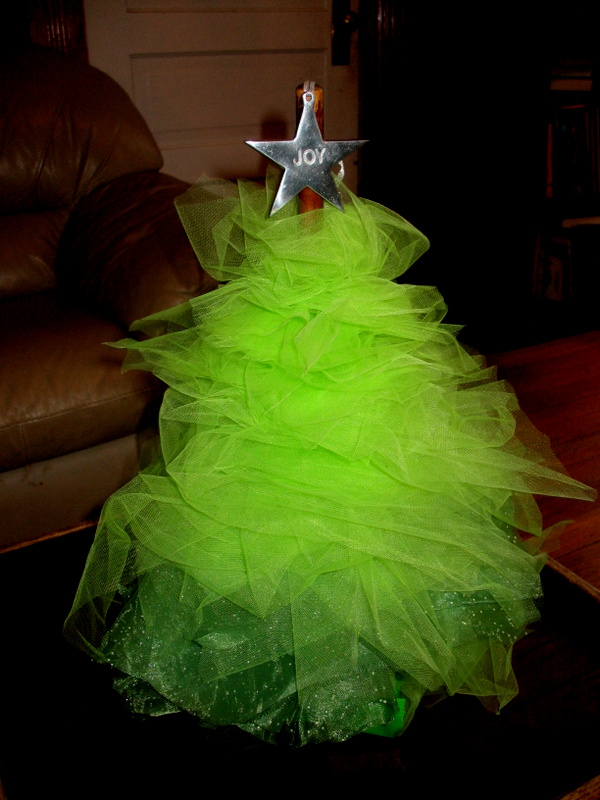
I made one tabletop tree out of left over scraps of material I had used to make some tutus for the Shamrock Run. See the tutus below from our fun run.

 But there's always leftover scraps (because I'm not the best seamstress and I always buy a little bit extra in case of mistakes...which I usually make) - and I HATE to throw anything away, that comes from growing up in a family with nine kids and a Dad who worked in a plywood mill to support us all. I'm cheeeeeap.


Anyway, I have to find a way to use the leftovers. So, green tree...wah-lah!


Then a gfriend said she'd like a pink one and that got me thinking about a friend over in France who probably won't want to run out and buy a tree, stand, skirt, lights and ornaments. So, I thought why not send her a tabletop tree? Here's how I made it:

I laid out the tulle on a cutting board and then cut strips of material. 


I took a dowel and a piece of wood and painted them pink. Then I drilled (okay, actually my hubby drilled) a hole in the base and glued the dowel in place. Then I took the tulle strips and started making holes in the center of the strips.


Then I put the strip on the dowel and pulled it apart - repositioning it to form a fluffy base (this is kind of like making a bow).
Then I alternated colors (light pink - dark pink) and just keep adding volume to the tree.

You can shape the tree any way you want. Longer pieces at the bottom and shorter at the top.

You simply pull the ribbon/strips to make the tree look the way you want it to look.


I took a light-weight Christmas tree ornament (a snowflake) and put it at the top like a star. Then I still wanted to do more. So I plugged in my handy-dandy glue gun.


While it was heating up, I found some old beads and rhinestones and laid out a few.

Then I glued them on the tree.

I left one side unembellished, in case McKenzie thinks it's just too much. :D

Now I have to think of a way to mail it. Hummmmm.....


Friday, December 7, 2012

Doomsday 2012

Doomsday is just around the corner, December 21, 2012 to be exact. This is the end-date of a 5125-year-long cycle in the Mesoamerican Long Count calendar. But the Maya calendar is really a system of calendars used in pre-Columbian Mesoamerica,

One new age belief is that December 21st is the beginning of a new era marking the beginning of a positive physical or spiritual transformation.

Others say it will be the day of  a catastrophic catastrophe while scholars dismiss the idea of such cataclysmic events occurring in 2012 and say December 21st simply represents the end of one calendar.

I like to look on the positive side of things. So, I'm throwing an End-of-the-World Party. I figure if we're all going to die, we might as well enjoy margaritas, munchies and make a little of our own mayhem.

How 'bout you?


Thursday, December 6, 2012

FUDGE - SUPER SIMPLE

I am a true chocoholic. So, with the holidays rolling (and I may be soon) around I thought why not make some homemade holiday goodies? So, I did.

Here's how I made it.

1 package of Nestle's semi-sweet morsels
1/2 cube of butter
1 can of sweetened condensed milk
1 teaspoon of orange extract
1 cup of chopped walnuts (optional)

(Just put it all together in a pyrex bowl and microwave until well-melted. Stir it up until it is smooth and glossy. Then pour it in a well-greased glass baking dish and chill) I cut little circular shapes and slipped them into mini-muffin tins to give as gifts.


This makes yummy fudge and it only takes a couple of minutes. A couple of important tips though for all you "new" bakers and creaters. You need to cut the chocolate when it's only lightly chilled and then let it chill over night before you remove the candy. If you don't do this step I'll show you what happens:

The top two pieces were pulled out before the fudge chilled all the way through. They look more like little turds than something you'd want to eat. So take my word for it and let the fudge chill thoroughly so you'll have candy like the bottom two examples.

You can get the mini muffin tins (candy papers) at your local grocery store. I use wax paper between the layers of goodies.

So happy baking, making and creating - the EZ way.


Wednesday, December 5, 2012

Hair Raising Experience

Okay. I admit it. I have some curl in my hair. Sometimes I even straighten my hair. But not very often. I don't like all that heat on my hair. So, when I went to get my hair done, at my local salon, and the hairdresser told me she had a cream I could put in my hair (after I shampooed it) that would leave my hair silky, shiny and straight (for one day), I thought, why not?

So, I used the product. And here's what happened:

Now, I don't know if it was a joke or not. I mean it's not April 1st. But, I did not curl my hair in this picture. Not at all.

My hair just went CRAAAAAAZEEEEEE! I even have bobby pins in this do to keep my hair down. It was about three times this size. And let me tell you, I already have some huge hair. I don't need to be turning up the volume when it comes to these locks.

So, what do you think? A prank? A mistake...? I don't know. But, this is a hairdresser that I've gone to for years. So maybe she handed me the wrong product. She simply gave me a small sample in a little plastic bag.

Perhaps it was a hair-raising joke? No big deal because it's supposed to wash right out...we'll see.