Join us as we read through the Bible

Join Us As We Read The Bible

Spend 5 Minutes in the Bible Today

History Doesn't Repeat But it Rhymes with Elon

Spend 10-Minutes in the Bible Today

READING THE BIBLE-1st Kings Cptr. 2

King David's Successor: Solomon

The Legacy of Lust & Punishment of King David

Sticks & Stones May Break My Bones. . . Reading the Bible

The Christmas story - Luke Chapter 2 - in the Bible

PROPHESY OF JESUS BIRTH - 2nd Samuel

The Ark of the Covenant - Reading the Bible This Year

The Resurrection of Jesus is the Good News of the Bible

The Crucifixion of Jesus Christ - Mark Chapter 15

What does God Say about righteous Anger? Read Mark 11

Divorce - What Does God Say About it? Mark 10

The Transfiguration of Jesus Christ - Mark 9

Demons, Dogs & Deafness - Bible Discussion Today

Jesus Walks on Water - READING THE BIBLE - Mark 6

Demon-Possessed Man Gets Healed - Mark 5 - READING THE BIBLE

The Witch of Endor - READING THE BIBLE THIS YEAR

A Story About a Giant Battling a Boy - David & Goliath

Jesus and Beelzebub - READING THE BIBLE THIS YEAR

Mark Chapter 2 - Jesus Heals

Christ's Resurrection - READING THE BIBLE THIS YEAR

The Death of Jesus and Judas Hangs Himself

THE LAST SUPPER - Matthew 26 - Reading the Bible

DIVORCE-What does the Bible Say

The Supernatural Ark of the Covenant-READING THE BIBLE

The Ark of the Covenant-READING THE BIBLE

Jesus Walks on Water-Matthew 14

Curious about Demons? Join us as we Read the Bible

Forgiveness in the Bible

READING THE BIBLE - REV. 20 - SATAN'S DOOM

Hallelujah! - READING REVELATION 19

Curious What the Bible Says about Prophesy?

Reading the Bible - Revelation 17 - The Woman on the Beast

7 Angels & 7 Plagues - The Tribulation in the Bible

The Angel of the Lord at Bokim - Reading the Bible

666 - The Number of the Beast - READING THE BIBLE

Joshua's Farewell-Reading the Bible this Year

The Woman and The Dragon - READING THE BIBLE IN 1 YEAR

The Two Witnesses for God - Revelation 11

The Angel & The Little Scroll - Revelation 10

Misunderstandings Can Start Wars - Joshua Chapter 22

Cities of Refuge: Joshua Chapter 20

END of DAYS: DEMONS & DESTRUCTION

The 4 Horsemen of the Apocalypse in Revelation 5

Revelation Chapter 2 - Angels, Stars, & the Future

Sunday, December 22, 2013

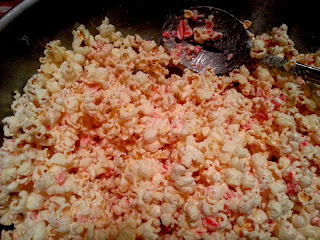
White Chocolate Peppermint Popcorn...YUMMMMMMM

It's so easy to make a special homemade gift to give your friends and neighbors without spending a lot of time or money. Here's how I did it this year.

First I popped a huge portion of popcorn.

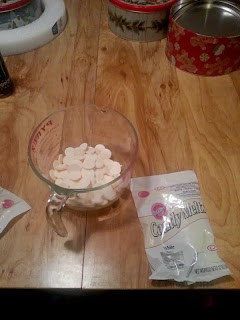
Then I melted some white chocolate.

You have to check it - to make sure you don't burn it.

I melt it slowly...checking on it as I go.
When it's smooth and glossy - you're ready.

I smashed about 8 candy canes -- but first I put them in a baggie to keep the mess contained - but you could use any peppermint candy - I just had these around the house during the holidays.

I stirred most of the crumbled peppermint into the white chocolate but I reserved some to sprinkle over the top of the popcorn to make it look prettier.

And I left a few big chunks of peppermint.

Then I poured the white chocolate and peppermint mixture over the top of the popcorn - in a stainless steel bowl - and I stirred it around to make sure it was well-covered.

Then I took some metal tins and lined them with aluminum foil and poured the popcorn inside.

That way they have the tin after they finish the popcorn for another little gift :D

But, if you don't have tins, you could use baggies - after the popcorn has cooled and the white chocolate has set - and wrap a pretty ribbon on the top and WAH-LAH a wonderful edible gift you can give and feel proud that it will be enjoyed. And, if you want to add a movie into the mix... no problem!

It can be a wonderful evening you can give a family...now, if only FROZEN was out in dvd. :D


Making an Ornament Wreath

It's really simple to make a Christmas Ornament Wreath. And, if you buy the supplies now while everything is 70% to 90% off (at the crafting stores) it will be super inexpensive too.

Here's how I did it.

First I bought a foam core base - but you could use cardboard or an old wreath frame - whatever you have.

Then I laid out my supplies

Next, I dumped all my ornaments into a bowl so I could see what I was working with and grab and go easily.
Then I simply started sticking the balls into the foam.
I shoved them into the foam and then glued them in place for extra sticking power.
Sometimes I'd put one in and then not like the look and pull it out and reposition it. It's all up to you.
Then I weaved a craft feather boa in and out of the ornaments. And I had to wiggle it around to get it just how I wanted it.

But then there were still some gaping holes. So, I used some little flower package ornaments (see above) and stuck them in where there were holes.

But then I still wasn't happy - so I grabbed out some ping-pong balls and started gluing them in place.
But then I didn't like the edges, so I used some ribbon that I glued in place to cover any foam that was peeking out, but you could use any silk flowers that match the color scheme you're going for. Or, you could use some greenery from your Christmas tree branches or even your yard (yep, I've been known to do that - lots of times). I just look around the house or yard and find something that works. A pinecone is beautiful spray painted gold or silver.


Then I hung it on the door (and I tried a couple different doors to see which one looked best).

I thought the blue ornaments would look nice on the blue door. But...

I worried about the feathers getting wet outside so I tried the inside door.
And that's where it is. I put my ribbon wreath outside. I think it will hold up better outside...but we will see.

I might have to find/make another wreath...you just never know.


Friday, December 20, 2013

Holiday Home Tour

I love the holidays and I love to decorate... And, if you're like me, and you want to see some homes that have decked their halls, go here and visit Jen on the Edge who is hosting a wonderful holiday tradition of people opening up their houses to share the way they celebrate and decorate.

Here's how my house looks for this year's holiday.

First there's the halloween wreath that I re-created into the wreath on my front door, which now I've switched out for this one...

I've moved my old ribbon wreath outside - to the front door.


And there's the wine bottle with the Christmas lights.

And my little tulle tree on top of the curio cabinet.

And my vintage ornaments inside the curio cabinet.


And my Christmas cards strung on a ribbon and hung up high where we can all see them.

And then there is the pointsettia.

And all the advent calendars 

with some of the presents still hanging on them.

And the Christmas stockings

 And my Christmas tree.
And then there's the outside of the house.


Thursday, December 19, 2013

Christmas Crafts

I was planning to have hats knitted, mittens crocheted, and outfits sewed into seasonal gifts.

Unfortunately I'm almost out of time so now I'm thinking of making some homemade goodies this weekend and packaging them for goodie gifts.

How 'bout you? Have you completed all your projects for the holidays? This one sorta snuck up on me.

So I'll be cooking, baking and trying to finish up some projects quickly this weekend. And, then I'll post all about them next week.

But come back tomorrow to see my Holiday Tour of Homes.

Wednesday, December 18, 2013

The Hobbit - The Desolation of Smaug

We went to an afternoon showing of the new Hobbit movie.

It was action packed and the graphics of Smaug were great. I thought it was a fun way to spend a Sunday afternoon.

My son wasn't so impressed. He didn't like the way the movie made Smaug look stupid and how the dwarfs were able to fool him so easily.  He said Smaug is a brilliant, ancient, dragon and they made him look foolish.

So, Jake was disappointed in the movie. But I enjoyed it.

So there you go - two opposing viewpoints from the same family.

If you go see it, let me know what you think.

Tuesday, December 17, 2013

Homemade Flannel Shirt

I always have trouble finding the colors, fabric and designs I want to wear...call me picky. Really it comes from when I was a kid and Mom and Dad couldn't afford to buy my Barbie dolls clothes. I had to start making them myself...either that or my dolls would have been naked and hanging around with Ken like that...I couldn't bear to hear what my brothers would have called Barbie...so I made clothes for them myself (without any patterns). I had to learn to crochet and sew from left over fabrics and yarn that Grandma didn't want to use.

I guess that's why I still do it today.

I wanted a flannel shirt for the holidays but all the ones I could find were cowboy'ish - not the look I was going for. So I walked up and down the aisles at the fabric store, just touching the bolts and feeling for that one special material. And when I found it - it wasn't on sale - but I only needed a little piece - if I made a tank top. So, that's what I did.

I just pulled out an old tank top and used it for my pattern.

There was only one problem - I forgot that flannel doesn't stretch. So after I sewed the tank top together, I realized I had to pull out my handy-dandy seam ripper and tear the seams out and insert some stretchy fabric.


It wasn't hard to do. All I had to do was cut two evenly sized pieces (to be the same on either side) and then I pinned them in place and started sewing.

I even had a little left over material to make a head band...yeah, I'm dorky like that.

So this holiday outfit cost me about $7.00 - not bad for an evening out.


Sunday, December 15, 2013

Do You Wanna Build a Snowman?

It was my turn to bring a dessert to book club and my family had just recently seen Frozen...so with the help of a little pinspiration, this is what I came up with.

First I made some chocolate cupcakes and then I cut off the tops - you know muffin tops don't look so good when you're trying to decorate.

Then I frosted the cakes with a white whipped frosting using a tip and a pastry bag.

Then I started building my snowman's face using marshmallows, red chocolate chips (that looked more orange to me - and I thought made a perfect carrot nose)

I used sprinkles for the eyes (I tried chocolate chips - but they were too big - see the face in back with the too large eyes.)

To get them to stick inside the marshmallow, I used a bamboo shish-kabob skewer to pierce the location first.

Then I set them on top of the cupcakes.

And I added green button sprinkles and a chocolate chip for a hat. The arms were black licorice.

They were super simple to make and my husband really liked the ones that looked like they were melting.

So Frosty-the-Snowman Cupcakes.