READING THE BIBLE IN 1 YEAR: Deuteronomy 28

READING THE BIBLE IN 1 YEAR - Deuteronomy 27

READING THE BIBLE IN 1 YEAR: Learn lessons about Kindness

Generosity and Divorce are themes as we Read the Bible this year

READING THE BIBLE IN 1 YEAR: Deuteronomy 22

Reading the Bible in 1 Year: History of the Children of Israel

The Nation of Israel - Reading the Bible in 1 Year

Showing posts with label #Halloween. Show all posts

Wednesday, October 11, 2023

ASMR Holiday Hair Styles

If you're looking for some fun festive holiday hairstyles, check out this video. With it's soft-spoken tones and asmr sounds, you should find it soothing and relaxing, while learning a four different Holiday hairstyles you can easily do at home yourself.

Friday, October 29, 2021

ASMR to Help You REST IN PEACE

Here's a Halloween Treat and maybe a Trick...to help you Rest in Peace


Thursday, October 28, 2021

Something to do on HALLOWEEN - now that SPOOKY SEASON is here


Courtesy of Google
 
Courtesy of Google

If you're looking for Haunted Halloween sites to visit this weekend, check these places out in Portland:

Oaks Park Haunted ScareGrounds

Old Town (otbrewing.com) Shanghai Tunnel Haunted Tour is Open!

The Crystal Ballroom has their Erotic Ball on October 30thand you can check out their site here:  Crystal Ballroom - Historic Music Venue located in Portland, Oregon (crystalballroompdx.com)

McMenamin's (including the  Bagdad Theater) is offering Halloween special treats: All Locations - Halloween - McMenamins

Unfortunately, Lone Fir Cemetery isn't having the Tombstone Trick or Treating this year but you can check out some photos from previous years: TOMBSTONE TRICK OR TREAT! – Friends of Lone Fir Cemetery
and hopefully next year it  will be back with us. 

You can also check out my Local Guide Map here
or paste in the link: https://goo.gl/maps/5zckDnc3sG9g9dteA

And Google's YouTube Interview of me here 
or paste in the link: https://youtu.be/k4TEHqAvQvs

Plus, if you're not in Portland and you'd like to check out a National Hot Haunted Picks, check it out here
or simply paste in the link:
https://blog.google/products/maps/maps-halloween-guide-2021/
 

Saturday, October 16, 2021

DIY Dragon Cake(s) Tutorial & Tips - plus a fail fun - Homemade Halloween


Have you ever wanted to make a Dragon Cake? Well here's how to do it. I've included some tips, tricks, and hints to help you turn some regular household ingredients into a Dragon! And, if you try to make this little guy, please let me know. I'd love to hear how yours came out. 


Monday, October 4, 2021

5-Minute Haunted Halloween Tour #2 (Seattle)


It's actually 7 minutes - but close enough. For the month of October I wanted to do something Spooktacular to celebrate the Scary Season. So, I decided to visit some "haunted" sites around my hometown. 

I've visited quite a few sites around Portland, Oregon. So, I decided to head up to Seattle to see a few new places on my path to the paranormal.

If you're interested, simply click on the video below to a hear a quick story about one very haunted location in Seattle.


5-Minute Haunted Halloween Tour of Green Lake in Seattle


Join us on our Haunted Halloween Tour! We wanted to start this Halloween Season off by sharing our own Spooktacular Series of Haunted Sights we were all anxious to see. So, what better way to ring the season in than with a quick Spooky Tour? 

I hope you enjoy this journey down the path to the paranormal with our first sight: Green Lake, in Seattle, Washington. Plus, we'll be telling you all a few stories we found along the way (some aren't even spooky and a couple might not have anything to do with the paranormal).

Saturday, September 25, 2021

Alien Makeup for the UFO Festival 2021

I'm going to the McMennamin's UFO Festival today! 

This should be fun - check out how I did my #Makeup and made my #Antenna below


Monday, September 6, 2021

A Haunted Telephone Call Came In While I Was Working on My Homemade Halloween Decorations - STRANGE!


Beware this blog post contains the story of a Haunted Halloween Telephone Call - or at least the answering of the call was super STRANGE. 

I was working on the table decorations, including the quilting of the placemats for my table decor when I had to take a break and something super strange happened. If you're interested, watch the short video below and listen to the story at 4:17, which is where I'm telling my son about the strange happening.

Let me know what you think about this strange call...and what you think of my placemats too ;D

Thanks for reading and watching.


Friday, July 30, 2021

Ghost Stuffing - DIY Halloween Decorations

YIKES!


Do you love the Holidays? Well, if you're like me, and  you love every holiday that happens to come around, then you decorate for all of them. 

And one of my favorite holidays to decorate and celebrate is Halloween. So, I start early.

I mean who doesn't love dressing up and getting free goodies? 

Plus, I have so much fun seeing the kids' faces when they come around, that I look forward to the entire season. 

But, the one thing I don't like is spending money. So, I make most off my decorations myself (or with a little help from my kids and husband). 

If you are interested in seeing how I made this little ghost and gave him his 3-D stuffing, simply click on the video below or visit my YouTube Channel - just search for Kim Kasch, and I should come up. I mean how many Kim Kasch's can there be?

And, if you make a little ghost like this, then please share in the comment section below because I'd love to see what you came up with.

Thursday, October 29, 2020

#DIY Dragon Jack-O-Lantern for Halloween


Have you ever wanted to have a pet dragon? Well, this is one EZ way to do it. Simply create your own.

And it's super simple to do.

First, you need to try to pick out a pumpkin that vaguely has  the shape of a dragon head.


After you've selected a pumpkin, start drawing, painting or cutting out the face you envision.


After you've painted/colored or cut the design you want, you begin assembling some thumbtacks to give it the impression of having scales. (I've done this on a previous blogpost for Dragon Eggs).

Then you insert your wings. (If you want to see how I did it, watch this one minute Youtube video)

And in the end, you'll have a fun fairytale character to display in your yard or on your porch.

And, if you make a dragon jack-o-lantern, please let  me know because I'd love to see it. 


HAPPY HALLOWEEN!


Wednesday, October 14, 2020

#DIY - Bake a Fun Halloween Cake


With an October birthday, I wanted to make my son a fun Halloween themed birthday cake. So, I pulled out some white chocolate to make some ghosts and tombstones for the top and then I made some black and orange buttercream frosting and went to work - well of course I had to bake some cakes first.

I baked four 6" wide and 2" tall cakes - I cake was a fail so this is three of those cakes stacked one on top of the  other. 

Then I did a crumb coating on the cakes and...well, if you want to see how I did it,  check out my YouTube video on the process:


And, let  me know if you have any questions or ideas about how I could have done a better job because I'm not a professional baker but I sure love to make treats, snacks and fun eats :D

Plus, here are a few photos that aren't on my Youtube channel:

Because One Cake is Never Enough


And two cakes does not a meal make :D


Luke was a good sport humoring his old Mom :D


HAPPY BIRTHDAY LUKE and HAPPY HALLOWEEN!
 

Wednesday, October 7, 2020

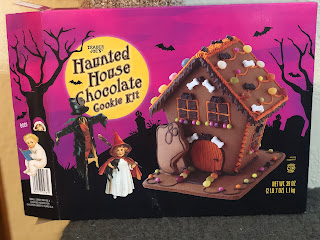
Haunted Halloween Gingerbread House


I decorated this little Haunted Halloween House by myself, when usually I have my daughter and daughter-in-law help me. It turned out sort of cute but it wasn't easy. Now I have a lot more respect for those people on Halloween Wars.

I'm not saying you shouldn't buy this little Trader Joes Haunted House Chocolate Kit but, if you do, you should understand that you might need a little help - at least putting it together. Because you have to hold it until the frosting sets enough to keep the sides from falling down.


But, if you're interested and want to see how I did it, please watch this very short video clip (and if you want my buttercream frosting recipe - you'll want to grab a pencil and jot it down when I talk about the frosting that comes inside the kit).


If you do make your own Haunted Halloween House, please share a  picture because I'd  love to see it.

HAPPY HALLOWEEN!


Thursday, October 1, 2020

DIY Life-Sized Fairy Garden


I love fairies and  fairytales. Who doesn't?

So, with Halloween being limited this year, I thought why not go all out with my decorations. To tell the truth, I go all out with decorations every year ;D 

And this year I've started early. I've made dragons, dragon eggs, fairies, toadstools, and decorated castles. I still want to make gnomes and do a little bit more.


If you'd like  to see how I made this toadstool/mushroom, check out my video below and check back as I'll be making my gnomes and more ;D

HAPPY HALLOWEEN!


Saturday, September 12, 2020

DIY Halloween Dragons - Free Pattern and All


So this year my Halloween theme is a Fairy Garden and I've been working on getting some decorations ready and starting to get them out in the yard. This is my dragon and the first one that I've ever sewed.

I looked on-line but couldn't find one that I liked. I really love dragon wings so that's what I was looking for - some large dragon wings. So, I decided to make it myself. I took a  look at  some  of the  dragons on pinterest and then I sketched out my pattern pieces.


After I drew the pieces, I cut them out of butcher paper but you could use old grocery bags if you have some sitting around the house.

Then I laid the pieces out on the material I had waiting for the  project (which I really love) and starting cutting away.


After I had the  pieces all cut out, I laid them out to see how they looked. 


My sister thought it looked like a giant turkey :( 

Anyway, then I used some duct tape to adhere some pipe cleaners to the inside of the wings to give them some ability to be posed into different positions.


Then I started sewing away.... until I had my dragon all assembled. I also took the belly piece and ribbed it by sewing lines across the belly. I stuffed every other belly slot with cotton balls and then I stuffed the body and wings with batting. Perhaps I overstuffed the wings - but that's  the way I like them. Last of all I sewed some beads onto the head, to make some beautiful jewel-toned eyes.


And then my dragon was ready to soar off into the wild blue yonder.

(If you'd like to make one of these, just let me know and  I'll email you the pattern pieces - or maybe you can pull them off this post).

And, if you do make a dragon, please share a photo with me. I'd love to see what you do for Halloween.


Monday, October 14, 2019

Jack Skellington inspired Halloween Project


Have you ever wanted to decorate for the holidays? Well, I always want to do something spectacular but somehow time always seems to get away from me and I have to settle for whatever I can do at the last minute.

Like this year, I wanted to have a Jack Skellington inspired ghoul in my yard by October 1st for all the neighborhood kids to enjoy... but, like I said, time slipped away too fast and by the middle of October I was suddenly aware that the month would be over in a flash. So I  recruited my sons and husband to help me out. And with their help, my Jack  was up and "grinning" at the neighborhood in no time. Well...maybe I should say grimacing over the neighborhood ;D

Anyway, here are a few photos of the process.

The guys started with a sketch of what they were going to do. Then they went to work building the "bones" of the figure out of 2 X 4's.

Once they had the basic structure put together, I went to work painting.

After all the wood was painted a dark gray, Jacob put the head on the top (which was over 15 feet in the air) and then I started dressing him in a thin sheet of black (weed barrier) cloth. The reason I used this was because water will run through the fabric without weighing the character down. This is an important piece of the project in Portland, Oregon. But before I got all his clothes on, Jacob had to light him up.


Jacob put one large red light bulb inside Jack's skull and hid the wire and the bulb (with a little work).


Then Jacob had to help me get his shirt on because, like I said, my Jack is super tallllllll. But even  after all that he still wasn't finished.


Next, I had to make his hands and get those attached. I wanted his fingers really loooooong and creepy...like spider legs. So with the help of duct tape (that miracle material) I think I did it. The only problem is that the guys think his fingers are too long (what do you think?)
I also strung together a few skulls for Jack to carry back to his lair and then I laid out some bones in the yard around Jack's feet.

All-in-all, this was a very fun family project to kick the holiday season into gear. 

Now to finish my witch....Mwah-ha-ha! But, before I go, I just want to wish all the ghouls and goblins out there a....

HAPPY HALLOWEEN!

Sunday, October 28, 2018

Thor and Sif - DIY Viking Halloween Costumes - here's how we made them

So anyone who knows me, knows I love holidays. I love to decorate for all of them. I might even decorate  for Ground Hogs Day, if I could think up something cute and fun enough to spend my time making the decorations because decorating does take a little time. 

And, one of my favorite holidays to decorate for is  Halloween. This year I thought, "How would Lars and I like to dress up ...?"

Quickly, Thor popped into my head and Sif wasn't far behind.  I thought, "that should be EZ-Smeazy to do".

First I needed a couple of capes but I didn't have  a pattern sew I thought - again - "that should be EZ enough."

I pulled out some  butcher paper and started sketching what  I was thinking. Then I cut out the fabric, leaving a little extra fabric for the seams...just in case.

 Of course the Nordic people live in a cold  climate so I figured we needed a little fur to keep us warm.

But I only bought one-fourth of a yard because that fake fur is expensive ($60 a yard). I figured $15.00 was plenty to spend on an accent. But even thought it was expensive for only a touch of the fur fabric, I think it was worth it because that fur added a lot. Luckily, the fleece for the capes was only $5.00 a yard and I had a coupon for Joann Fabric and Craft so the capes only cost me about $10 a piece to make. Then I needed some armor and there was no way I was going spend any money on metal I'd use once.


So, I bought this cosplay fabric also at Joann Fabrics. It was spendy too but of course I had another coupon.  Still, I had to spend $30.00 for the material but split between two costumes it was only $15.00 a piece and I thought that was reasonable enough. 

Then we needed a few accessories...like a hammer, which Lars made using some Styrofoam and a dowel. 

Then he painted it and added some tennis racquet tape to the handle.

Still, it seemed a little one-note in color, so he dry-brushed some black paint on the "stone" and touched up the edges with a faint hint of gold to give it a three-dimensional effect. Still I needed a shield and a sword. So I took a floor tile and with a little help from my son and his heat gun, I had the beginnings of a shield.


I added some embellishments that I stuck right into the thick foam and with a little paint and a handle (that I duct-taped on the back), I had a shield. Then, the morning of the party, I asked Lars if he could make me a sword. "No problem," he said. I've got some extra 1X3 CVG (clear vertical grain) out in my shop. And, lucky for me, he can make things fast. 


With a few jewels glued on and a little Danish Oil,  I had a sword in my hand.

I still wanted some wrist guards and I used some leather-look-alike ribbon with studs on it and simply sewed some snaps on the edges of the ribbon. I think that ribbon gave a neat effect.

And then there was the hair that needed styled. Thanks to Fatina and her skilled braids we were in business.


 I also picked up two child-size armor breast plates at the dollar store for $1.00 a  piece and with my son's heat gun again, we had some shoulder armor for Lars to wear. 

All in all, I think this was a fun project that we really enjoyed doing together and the final effect was so much fun. 

So tell me, are you dressing up? Do you make your own costumes or do you rent or buy them? Or do you even celebrate Halloween?