Angels...? We're Reading the Bible Today: Joshua 5

Reading the Bible in 1 Year: The Death of Moses

Generosity and Divorce are themes as we Read the Bible this year

Reading the Bible in 1 Year: History of the Children of Israel

The Nation of Israel - Reading the Bible in 1 Year

Showing posts with label #DIY. Show all posts

Tuesday, June 9, 2020

Fairy Gardens

I've always wanted a Fairy Garden...so I decided to make one 

Or two...


Here's how I did it:

First I grabbed a broken ceramic pot that my dog knocked off the porch when she ran past it. And I began painting it using a gold acrylic paint. When I was done painting, I started gluing...


I glued some moss and little garden-like embellishments all over the pot. Next I  painted the chipped-off piece yellow. Then I took an old  button and sewed a bead on the  button and glued it to the chipped piece because I thought this would make a perfect doorknob. I glued the "door" back onto the pot using a strong epoxy glue.

Then I used my handy-dandy hot glue gun to make a wreath to hang over the door.


I hung the welcome wreath over the door but I still wasn't finished. 

I also painted some windows on the sides and glued more moss onto the "house". 

I thought it turned out really cute but I'm not finished yet.

I also made a birdcage fairy house to hang on a post.

Now all I have to do is find a nice spot in the garden for these tiny homes. 

Friday, May 1, 2020

DIY Garden Trellis - Homemade Garden Accessories


If you've ever wanted to create your own custom Garden Trellis, here's the way to do it.


If you have any questions, please let us know. Lars would be happy to answer any questions.

Plus, if you make a garden trellis, please share your story below in the  comments.

Happy Gardening!

From Kim and Lars

Thursday, April 30, 2020

Do You Remember Door Dashing?

Kids used to knock on the doors of their neighbors and then dash away. It was called Door-Dashing or Ding Dong Ditch - do you remember it?

Well, our family did it, like most things, only differently - especially on May 1st.

We'd make May Baskets and hang them on the  neighbors' doors. Then we'd knock on the door and dash away. We'd  usually hide somewhere and watch what happened when they found a basket - or cone - filled with flowers hanging on their doorknobs. That was they way Mom taught us to celebrate the  beginning of spring. 

May Day has been celebrated for centuries as the time of festivals to herald the beginning of spring and what better way to celebrate spring than with a basket (or cone) of flowers?

Here's how I used to make these little gifts to give to friends and neighbors.

I hope you have a bloom-filled May Day!

And, if you make any of these May Day baskets,  or if you remember the tradition of  hanging them on the doorknobs or neighbors,  please share in the comments below.


Monday, April 27, 2020

DIY Victory Garden

Victory Gardens were a common sight during World War I and World War II. They were started to help supplement rations and keep up morale. 

And, gardening can be more than useful. It can be fun.  Plus, you can have your kids help you create this garden and even start it inside the house using old plastic pop bottles, as makeshift greenhouses.


Homemade Greenhouses
Seeing herbs, vegetables and fruits, you've planted from cuttings and seeds, sprout and bloom is thrilling to watch.


Victory Gardens were also called Food Gardens or War Gardens. And since this historical pandemic is a World Wide War against the Coronavirus or Covid-19,  I think it can’t hurt to have some extra food in our own yards. 

Most of us who live in a big city, have already experienced some shortages at local grocery stores,  such as flour, sugar, yeast, and  toilet paper. So, although we  might not be able to do much to stop the toilet paper shortages, we can try to limit some of our own food shortages—at least during the spring, summer and fall by being a little proactive and starting our own small Victory Gardens and by preparing our own jellies, jams, and preserves.

So, I thought I’d share some tricks, tips and ideas I’ve been using to create my own personal Victory Garden. I live in a big city, on a small city lot, but I've found ways to grow-up rather than to grow-across a wide area. And, if you live in an apartment, you can grow plants in pots and out on balconies, or in shared spaces. Some cities even have community gardens, where you can share a plot of land to garden on.

I’m hoping these ideas might help other people build their own Victory Gardens.

Here is a small list of
recommendations:


  •  Don't waste food.
  • When you have food that starts to spoil, such as potatoes, onions, beets, etc. think about whether or not you can take a cutting from the vegetable and plant it out in your garden. 
  • You can use old wood to make stakes, trellises and tomato cages to grow your plants up toward the sky.


This is the top of a  potato I cut off, while I was preparing a pot of potatoes for dinner. I simply stuck some bamboo skewers in the cutting and placed it in a cup of water. The raw edge of the potato barely touched the water (using a type of hydroponic gardening) or gardening without having the plant in soil. Usually people amend the water (or enrich it with nutrient mineral solutions), when they hydroponically garden. But, I simply placed my potato cutting in a little water inside a coffee mug. Then I watched it grow.

Some people have simply planted rotting potatoes and had a lot of success that way.

I'm hoping you'll try this because it's one way to help stretch your food budget and keep your food supply within reach.

And, if you try your hand at a Victory Garden, please let me know. I'd love to hear how you do.

I’m also planning to share some of my successes and failures growing my own sour dough starters. Sour Dough starters can help you always have access to bread, even if the store is out of yeast or bags of bread. :D

Sunday, April 19, 2020

Fears, Flops and Total Fails

Barely a Bear
I usually only post my best work. I mean who wants to post their worst failures--but, believe me, I've had my share of flops and failures. See, the little bear (above) who literally collapsed before I could even frost him? Or, the sad turkey below that shouldn't have been so afraid of Thanksgiving because he looked so sorry, no one would want to eat him.

Super Sad Turkey
 Or what about the time I'd seen one too many episodes of Cake Boss and Ace of Cakes , so I thought I could carve a cake into the shape of my brother-in-law Bo?
Bo Knows but this time Bo Blows
Or the time I decided to make cupcakes when it was about 100 degrees outside and my frosting kept melting?
Dragonfly Frosting Fail
Or the time my homemade marshmallow fondant was a complete flop?

Fondant Failure
I could go on and on, but the one thing I'm proud of is the fact that I haven't let my previous failures stop me. Instead, I push the fear of my next failure to the back of my brain and simply try to learn something from each of my (admittedly) horrible flops and failures and move on.

And, by letting go of my disasters, I've had some really happy moments. Such as:

Fatina's Graduation Barbie Cake - Because You're Never Too Old for Barbie
The graduation cake I made for my daughter-in-law, Fatina.

And, the Hello Kitty cake I made for a friend's daughter's birthday.

Hello Kitty
Or the wedding cake I made for my friend (with my daughter-in-law's help).

I Do Instead of iDud

My point is, sometimes we need to laugh at ourselves and pick up our wounded pride and simply strive to be the best we can be. And--of course don't be so silly as to compare yourself to the Cake Boss or the Ace of Cakes. Instead, simply have fun with your friends and family and learn to laugh with them when things go wrong because that's the best way to make it through to another day.

Family Laughing at my Flops


Sunday, January 19, 2020

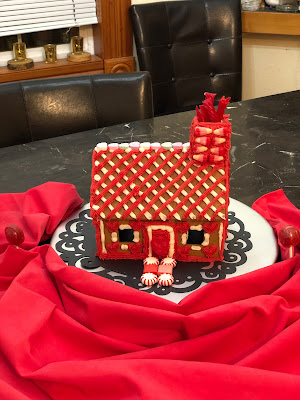
Valentine's Day Gingerbread House

At Christmas I wanted to make a gingerbread house but never got around to doing it. So, I decided on this long holiday weekend, I'd make a Valentine's Day Gingerbread House, with the help of my daughter and daughter-in-law. And this is how it turned out.


If you want to see how I did it, click on the link below.

Video of how I made the gingerbread house

And, if you watch the video, please let  me know what you thought.

Thanks!


Friday, December 6, 2019

POTLANDIA...is just a name


PORTLAND OREGON is known as Potlandia but around my house it means something else entirely.

I have my own hanging gardens. Of course, it's just a few potted plants I have perched up on my picket fence but I think it's pretty.

But then, when the cold weather and holidays roll around, I want to transform my fence into a holiday display so I update the little pots with floral stems I've purchased at Joann Fabric and Crafts


I used red and white paint because if I’d used red and green in the garden, the green wouldn't have shown up. And white makes the plants pop!


After the paint dried I stenciled some fun festive words on the front like Hope, Wish, Dream, Love, Inspire, and - of  course - believe.


This was a fun, easy craft, and I love to watch people walk past the house and stop to get a word of encouragement as they go on by.

Thursday, December 5, 2019

I'm Dreaming of a . . . Pink Christmas

Some people dream  of snow...not me, I prefer a warm, cozy Christmas. And what could be better than spending the cold weather inside, crafting?

This is an old craft I've done before...but believe me, I'm working on new ones but I thought I'd share this oldie but still a goodie one with you.

This is an easy tree to make. Don't feel restrained to go small; you can make it as big as you want.

All you need is a little tulle, which you can pick up at any fabric store. And, if pink isn't your color, you can go green with a green tree...

Or purple, if you prefer.

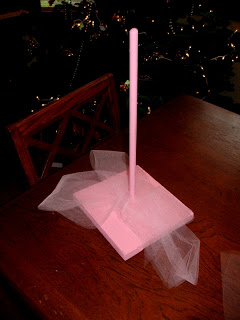
Here's how to do it. Lay out your fabric 

Then cut it into strips
Use a dowel and a heavy piece of wood to hold the tree and simply start stacking your strips...
It's as simple as that - then add a star

And you could be finished there. Or pull out your handy-dandy 
glue gun

And then add whatever embellishments you like...I like sparkly rhinestones or fake gemstones

And voila - you'll have a pink or green or even purple Christmas! But no matter what color you prefer,  I hope it's a  healthy, happy and fun-filled Holiday!


Sunday, November 24, 2019

Thanksgiving is Almost Here . . . Be Brave!

With the holidays coming … I'm getting ready to do some serious baking. But before I pull out the rolling pin and flour, I'm trying to remember some of the cakes I've made in the past. And, maybe by taking a moment to remember, I won't make the same mistakes.

But believe me, I'm going to be trying some new things (this is where I'm trying to be brave) so there will undoubtedly be a few fails, flops and hopefully even a few things that turn out.

I know they can't all be winners and my family will be sure to tell  me which ones are the failures.


But, I thought I'd share one fun Thanksgiving cupcake and one fantastic flop of a cake I made one year. Of course, I think it's almost okay that this failure looks so miserable, I mean after all we're all getting ready to eat him. And even though he didn't turn out as cute as I wanted, he still tasted okay...at least if you can tell by how quickly he disappeared.


Anyway, I hope you have some fantastic baked goods for your holiday feast. And, if you do, please share a link to your blog or a photo in the comments, so I can take a peek - I'm always looking for inspiration to create more delicious goodies. 

And, I wanted to wish you all  a HAPPY THANKSGIVING! 


Monday, October 14, 2019

Jack Skellington inspired Halloween Project


Have you ever wanted to decorate for the holidays? Well, I always want to do something spectacular but somehow time always seems to get away from me and I have to settle for whatever I can do at the last minute.

Like this year, I wanted to have a Jack Skellington inspired ghoul in my yard by October 1st for all the neighborhood kids to enjoy... but, like I said, time slipped away too fast and by the middle of October I was suddenly aware that the month would be over in a flash. So I  recruited my sons and husband to help me out. And with their help, my Jack  was up and "grinning" at the neighborhood in no time. Well...maybe I should say grimacing over the neighborhood ;D

Anyway, here are a few photos of the process.

The guys started with a sketch of what they were going to do. Then they went to work building the "bones" of the figure out of 2 X 4's.

Once they had the basic structure put together, I went to work painting.

After all the wood was painted a dark gray, Jacob put the head on the top (which was over 15 feet in the air) and then I started dressing him in a thin sheet of black (weed barrier) cloth. The reason I used this was because water will run through the fabric without weighing the character down. This is an important piece of the project in Portland, Oregon. But before I got all his clothes on, Jacob had to light him up.


Jacob put one large red light bulb inside Jack's skull and hid the wire and the bulb (with a little work).


Then Jacob had to help me get his shirt on because, like I said, my Jack is super tallllllll. But even  after all that he still wasn't finished.


Next, I had to make his hands and get those attached. I wanted his fingers really loooooong and creepy...like spider legs. So with the help of duct tape (that miracle material) I think I did it. The only problem is that the guys think his fingers are too long (what do you think?)
I also strung together a few skulls for Jack to carry back to his lair and then I laid out some bones in the yard around Jack's feet.

All-in-all, this was a very fun family project to kick the holiday season into gear. 

Now to finish my witch....Mwah-ha-ha! But, before I go, I just want to wish all the ghouls and goblins out there a....

HAPPY HALLOWEEN!

Sunday, October 28, 2018

Thor and Sif - DIY Viking Halloween Costumes - here's how we made them

So anyone who knows me, knows I love holidays. I love to decorate for all of them. I might even decorate  for Ground Hogs Day, if I could think up something cute and fun enough to spend my time making the decorations because decorating does take a little time. 

And, one of my favorite holidays to decorate for is  Halloween. This year I thought, "How would Lars and I like to dress up ...?"

Quickly, Thor popped into my head and Sif wasn't far behind.  I thought, "that should be EZ-Smeazy to do".

First I needed a couple of capes but I didn't have  a pattern sew I thought - again - "that should be EZ enough."

I pulled out some  butcher paper and started sketching what  I was thinking. Then I cut out the fabric, leaving a little extra fabric for the seams...just in case.

 Of course the Nordic people live in a cold  climate so I figured we needed a little fur to keep us warm.

But I only bought one-fourth of a yard because that fake fur is expensive ($60 a yard). I figured $15.00 was plenty to spend on an accent. But even thought it was expensive for only a touch of the fur fabric, I think it was worth it because that fur added a lot. Luckily, the fleece for the capes was only $5.00 a yard and I had a coupon for Joann Fabric and Craft so the capes only cost me about $10 a piece to make. Then I needed some armor and there was no way I was going spend any money on metal I'd use once.


So, I bought this cosplay fabric also at Joann Fabrics. It was spendy too but of course I had another coupon.  Still, I had to spend $30.00 for the material but split between two costumes it was only $15.00 a piece and I thought that was reasonable enough. 

Then we needed a few accessories...like a hammer, which Lars made using some Styrofoam and a dowel. 

Then he painted it and added some tennis racquet tape to the handle.

Still, it seemed a little one-note in color, so he dry-brushed some black paint on the "stone" and touched up the edges with a faint hint of gold to give it a three-dimensional effect. Still I needed a shield and a sword. So I took a floor tile and with a little help from my son and his heat gun, I had the beginnings of a shield.


I added some embellishments that I stuck right into the thick foam and with a little paint and a handle (that I duct-taped on the back), I had a shield. Then, the morning of the party, I asked Lars if he could make me a sword. "No problem," he said. I've got some extra 1X3 CVG (clear vertical grain) out in my shop. And, lucky for me, he can make things fast. 


With a few jewels glued on and a little Danish Oil,  I had a sword in my hand.

I still wanted some wrist guards and I used some leather-look-alike ribbon with studs on it and simply sewed some snaps on the edges of the ribbon. I think that ribbon gave a neat effect.

And then there was the hair that needed styled. Thanks to Fatina and her skilled braids we were in business.


 I also picked up two child-size armor breast plates at the dollar store for $1.00 a  piece and with my son's heat gun again, we had some shoulder armor for Lars to wear. 

All in all, I think this was a fun project that we really enjoyed doing together and the final effect was so much fun. 

So tell me, are you dressing up? Do you make your own costumes or do you rent or buy them? Or do you even celebrate Halloween?