READING THE BIBLE IN 1 YEAR: Deuteronomy 28

READING THE BIBLE IN 1 YEAR - Deuteronomy 27

READING THE BIBLE IN 1 YEAR: Learn lessons about Kindness

Generosity and Divorce are themes as we Read the Bible this year

READING THE BIBLE IN 1 YEAR: Deuteronomy 22

Reading the Bible in 1 Year: History of the Children of Israel

The Nation of Israel - Reading the Bible in 1 Year

Sunday, October 28, 2018

Thor and Sif - DIY Viking Halloween Costumes - here's how we made them

So anyone who knows me, knows I love holidays. I love to decorate for all of them. I might even decorate  for Ground Hogs Day, if I could think up something cute and fun enough to spend my time making the decorations because decorating does take a little time. 

And, one of my favorite holidays to decorate for is  Halloween. This year I thought, "How would Lars and I like to dress up ...?"

Quickly, Thor popped into my head and Sif wasn't far behind.  I thought, "that should be EZ-Smeazy to do".

First I needed a couple of capes but I didn't have  a pattern sew I thought - again - "that should be EZ enough."

I pulled out some  butcher paper and started sketching what  I was thinking. Then I cut out the fabric, leaving a little extra fabric for the seams...just in case.

 Of course the Nordic people live in a cold  climate so I figured we needed a little fur to keep us warm.

But I only bought one-fourth of a yard because that fake fur is expensive ($60 a yard). I figured $15.00 was plenty to spend on an accent. But even thought it was expensive for only a touch of the fur fabric, I think it was worth it because that fur added a lot. Luckily, the fleece for the capes was only $5.00 a yard and I had a coupon for Joann Fabric and Craft so the capes only cost me about $10 a piece to make. Then I needed some armor and there was no way I was going spend any money on metal I'd use once.


So, I bought this cosplay fabric also at Joann Fabrics. It was spendy too but of course I had another coupon.  Still, I had to spend $30.00 for the material but split between two costumes it was only $15.00 a piece and I thought that was reasonable enough. 

Then we needed a few accessories...like a hammer, which Lars made using some Styrofoam and a dowel. 

Then he painted it and added some tennis racquet tape to the handle.

Still, it seemed a little one-note in color, so he dry-brushed some black paint on the "stone" and touched up the edges with a faint hint of gold to give it a three-dimensional effect. Still I needed a shield and a sword. So I took a floor tile and with a little help from my son and his heat gun, I had the beginnings of a shield.


I added some embellishments that I stuck right into the thick foam and with a little paint and a handle (that I duct-taped on the back), I had a shield. Then, the morning of the party, I asked Lars if he could make me a sword. "No problem," he said. I've got some extra 1X3 CVG (clear vertical grain) out in my shop. And, lucky for me, he can make things fast. 


With a few jewels glued on and a little Danish Oil,  I had a sword in my hand.

I still wanted some wrist guards and I used some leather-look-alike ribbon with studs on it and simply sewed some snaps on the edges of the ribbon. I think that ribbon gave a neat effect.

And then there was the hair that needed styled. Thanks to Fatina and her skilled braids we were in business.


 I also picked up two child-size armor breast plates at the dollar store for $1.00 a  piece and with my son's heat gun again, we had some shoulder armor for Lars to wear. 

All in all, I think this was a fun project that we really enjoyed doing together and the final effect was so much fun. 

So tell me, are you dressing up? Do you make your own costumes or do you rent or buy them? Or do you even celebrate Halloween?

Thursday, October 18, 2018

Making, Baking and Creating

I love to bake and when one of my kids' birthdays rolls around, I'm all about baking,  making and creating. It's not to say that I'm great at it but I love to do it. So, whenever there's a birthday, you can find me in the kitchen trying to make something sweet for one of my kids, my husband, or a friend ;D

I think baking is easy. All I do is run to the cupboard--like Old Mother Hubbard--but instead of bones, I pull out cake pans and I don't always know what I'm going to make in the beginning but once I get going, something pops in my head.

It's easy to do. All I do is stack layers and cut and shape or simply decorate until I have what I want.

And, I have a BIG family so this fall I made more than a few cakes.

Here's how I did it.

I started with a couple layers of cake (this one was two pineapple upside down cakes that I stacked  together) because my son loves Pineapple... then I covered them with fondant.


And started to decorate.

I was only thinking of pineapple...so this is where I began. But then I had  to add a little bit more.

But Luke's birthday is in October and this didn't seem very Halloweenie . . . and I was thinking of scary eyes...so on the backside I added a couple of Oreo eyes

But that still didn't seem like enough...so I baked a couple more small little cakes...just in case
And I stacked those together to make pumpkins. Then I frosted them with some orange cream cheese frosting.

And to top it off, I used a PayDay Candy Bar as the stem. I guess I shouldn't have added the fondant leave because my husband said that made the cake look like an orange apple. Oh well, I never said I was  great.

And then we sang and ate and ate...oh, but first,  Luke had to blow out his candles.

I think this photo makes him look like he's breathing fire... and that  inspires  me  to make a  dragon cake...next time, I think.

Anyway,  I'd  love to hear about the cakes  you make,  bake  or create. 


Friday, October 12, 2018

GHOST GIRL - How to Make One "Appear"


I’m still working on my Halloween decorations. I'm trying to create a Spooktacular Shoctober.
I have my Ghost Girl haunting the front lawn.  But this wasn't enough so I had to do a little bit more.


She’s made out of chicken wire to make the shape of her dress. Then we draped cheesecloth over the frame. I’m still working on her. I’m thinking of making arms and a head from chicken wire and draping more cheesecloth over the frame to create the illusion of a woman in white floating through the yard.

Any other Halloween lovers out there? What do you think? Any ideas on what else I could do to make the Ghost Girl “appear” ?


Wednesday, October 10, 2018

Quilting and Homemade Stuffed Animals

Those of you who know me, know I love to make, bake and create. I just can't seem to help it. "Sew" when I saw this little elephant fabric, I thought, "I'd love to make a little stuffed elephant for a friend's baby shower." Of course, I'd never made a stuffed animal before but again I thought, "How hard can it be?" 

Lucky for me, I was thinking in 2D not 3D. If I'd had to make four legs, that would have thrown my making into another dimension entirely...thus, 3D not 2D.

But, if you're like me and have never made a stuffed animal (without a pattern) and you're curious how I did it, just keep reading.

First, I was inspired by this fabric, which I used to make the backside of a baby blanket for my friend's shower.

But like everything I do, inspiration comes from many sources. Do you see the yellow and gray polka dot ear on the front side of the baby blanket? Well, immediately I thought an all gray elephant just wouldn't do. Imagine that. But I was also inspired by Mike Curato's Little Elliot - Big City books.

 I just heard Mike Curato give a presentation in L.A. at the SCBWI Summer Conference. I thought, "I want my little elephant to be all polka dotted--like little Eliott." So I went in search of some more fabric - this time polka dotted. And I figured I only needed about one-fourth a yard for a stuffed animal. 

Then I thought, "I really like the shape of the little gray elephant above." So I drew the shape on a piece of paper (and I'm not an illustrator or an artist) so I drew it lightly, in case I made mistakes (which is super silly because it was paper and I was using a pencil--duh, I could have erased a mistake-but whatever, that's what I did). 

When I got that done, I drew the shape right on the fabric.


Cut it out and laid the front sides together and sewed around the edges. I left a little section open so I could stuff it (I made a mistake here--I left the trunk open to stuff, I should have left a foot open to stuff so it wouldn't be noticed as much--but that's the way I did it.)

After I had him stuffed, I sewed a couple of yellow ears on (because I had some leftover yellow fabric from when I made my Candy Corn Cushions for my benches out in my yard). Then I took some leftover material and braided a tail and sewed those on. But I still needed an eye. I didn't want to sew something on that the baby might pull off and eat so I embroidered a little eyelash around one of the polka dots (on both sides). And Voila...or, as I would say,  Wah-lah!


I had a fun little gift for the baby shower (a baby blanket and a stuffed elephant). 

Let me know if you have made a stuffed animal for a child. I'd love to visit your blog to check it out.
 

Tuesday, October 9, 2018

Haunted Little Lending Library - it's Spooktacular

I've heard of haunted houses and haunted graveyards or even creepy crypts
But have you ever heard of a haunted Little Lending Library . . .? 

Well, now you have. See that ghost peering out the window at you -- or the spirits floating in the wind just above the doors?
Yep...my little lending library (which just happens to match my house--see the house in the background?) is haunted--at least during the month of  ShOctober ;D 

I just couldn't leave it alone...you might say I was haunted by the idea of decorating the little library. And, if you take a moment to look really closely, you'll see witches flying across the front and pumpkins and bats blowing in the breeze, just underneath the eaves. But that's not all...there's more to come.

We (as in my husband) will be installing a couple more things, including a teeny-weeny chandelier -- that will really light up (if everything goes according to plan). 

And another classic sconce on the inside wall of the library. 

I guess you can tell, I never had a dollhouse and always wanted one. But this is even better. My little library gets a lot of traffic because it's right on the bike path, next to a busy street. So, people stop by all the time to "check-out" a book. Of course it's all on the honor system. Books  are free to take and keep, I just ask that, sometime in the future, those who have taken a book, drop by one of the books they want to donate. It's a "pay-it-forward" system.

When I asked my husband to build me this lending library, he went all out. He installed hardwood flooring, wallpaper and even a chair rail on the inside. He had to handcraft the tiny siding to match the Victorian Gingerbread on our house and then he installed a cedar shake roof. I love this little library but, like I said, for the month of October it's totally haunted. 


Sunday, October 7, 2018

Wishing y'all a Spooktacular Fall

Halloween is lurking just like a ghost. . .around the corner. And with so many negative spirits haunting our recent past, I was thinking... (yep, I know that's a surprise) we should do something festive and fun to celebrate the coming holiday.

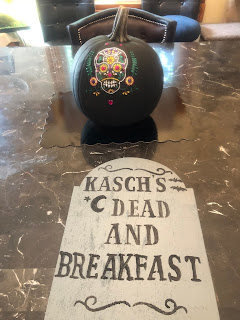
This is how I've been spending my energy lately...preparing our family's new "Dead and Breakfast"...for any stray ghouls who want to stop by unexpectedly.

And I just had to make a Day of the Dead pumpkin. It was super simple. I painted a regular pumpkin from the garden. Of course, I spent a little extra time trying to pick just the right one.

Then I covered the shell with black paint, which was super simple to do. But you could use the pumpkin in its original shade, or opt for a green or white gourd.
The problem with white gourds for me is that I always envision ghostly images instead...

And I paint those little gourds into characters... hey, did I mention I'm a writer? Characters are always popping into my head and inspiring me...but I digress.


And that was just the beginning. We decided to build our own family graveyard...in the front yard.


And it turned out pretty realistic looking. But then we added our fun sign...
Which I painted on an old piece of wood my husband shaped for me with his jigsaw.

And we  hung it out over the graves. 


But that wasn't enough. We also made a scarecrow.

And a ghostly figure out of chicken wire, which we painted with glow-in-the-dark spray paint.


And hung little scarecrows on the fence, in my little flowerpots. Then I wanted witch brooms to hang more lights. But when I found out how much they cost, I thought, I can make some instead. So, I ran to the local feed store and bought a bale of straw and stopped at a lumber store to buy some dowels. The straw was $11.99 at Side Saddle Tack and the dowels were about $3.00 a piece at Mr. Plywood. So for about $30.00, I got more than enough materials to make 6 brooms. The brooms were really easy to make. I laid out some strapping tape on the bale and placed the straw on the top of the tape and simply rolled  the dowel around the tape. I used a bit of twine and voila! I had my brooms. 


The hardest part of making the brooms was keeping my little Freya (my German Shepherd) busy by throwing her ball for her.

Then we lined the brooms up the walkway and wrapped them in lights.


And at night, they are seriously Spooktacular!
Don't they look like they're on fire? An unexpected scary little touch.

Plus, I hung a beautiful fall wreath on the front door.


And made some candy corn cushions for my benches out front (you can check out my previous post about how I made those but here's a quick picture)
 Or two...

And they're reversible, so I can use them through Thanksgiving. 

Maybe we're getting carried away, but we  keep adding to our display.
I don't know...what do you think?

Anyway, I'm hoping you have a Spooktacular Fall Y'all!!!